Showing posts with label DT Project. Show all posts

Wednesday, 4 December 2013

Altered Canvas


Hi there crafters, today I wish to share with you a canvas I made using Prima Life Time Collection other Prima Products.  I love dabbling in mixed media almost as much as I enjoy shabby chic and with the Prima Life Time papers, mixed media is a breeze because most of the work has been done for you  You must make a visit to the store and take a look at the awesome papers...I am sure by the evidence of most of my DT projects it is quite obvious how enthralled I am with this collection.

So lets take a look at my canvas...
I love the feminine theme of the canvas; a princess to oneself, family all important and enjoying the little things in life.  Flowers is one of the ultimate loves of a woman and what better way to express that than a bunch of beautiful Prima flowers!

The tree and picket fence was part of a RAK from a friend and the the word sentiments are cut outs from the awesome paper collection.  I added a Prima heart button in the center for additional symbolism . 
The butterfly, sunflowers and mini flowers are from my stash.  A Prima Life Time buttons and smile tag complete that corner
I used a variety of Prima flowers from various collections; all dabbed with white acrylic paint.  The wooden clock and sentiments on the side are Prima and designed by the awesome Finnabair!
Using permanent black ink I stamped the Prima doll stamp on papers from the collection that had a brownish hue.  I also stamped the skirt and bodice on different papers from the collection too, cut them out, added a strip of lace and then adhered to the doll.  I just could not resist adding a glittered Maya Road crown to the stamped crown on the doll's hair - love it!  

I just love the cluster of Prima flowers...who wouldn't!!
I used a variety of masks, stencils, inks, paints and sprays on the canvas before adding my embellishments   As I was using my mod podge, gesso and pastes I had no idea what the final look of the canvas would be...and how do I feel about it??  Love the outcome, will add a final glaze spray to help hold and maintain the canvas so I can keep it for a long time to come.

Thank you for stopping by and I hope you find inspiration to create one of your own...Janine

Sunday, 21 July 2013

Life Time Mini Album


Everybody knows I love making albums ... could not resist to make a quick one with the awesome Life Time Papers. The album I made is perfect for a family album.  Lets take a look..


This album is so quick to make anyone can make it within a few hours...it is based on the tutorial of Steff with a grin".  The covers are chipboard and uses two 12x12 sheets inside.  What I love about this album is you can "grow" it.  I could take another two sheets, use bigger ring binders and I could add so much more photographs. See the width..how slim.  You could create as many pages as you wish...


The inside pages are also fun to make!  I added more texture and colour on some of the pages


It was difficult for me not to add lace everywhere but I managed "smile".  I adhered either a whole or half a doily to most of the pages. On this mini I used mod podge as my adhesive.  The burlap under the flower also matches well with the Life Time collection.  


The pages of this collection is absolutely amazing.  If you are uncomfortable working with mixed media this collection has already done it for you - all you have to do is cut and embellish.  Most of the embellishments in this mini album are from the Life Time collection but all of them are Prima!


Play around with some Prima masks and stencils...add some glimmer mists, distress inks, Prima flowers and Life Time stickers and cutouts and you have a awesome page. I have cropped the right hand bottom corner - see image below to provide a few more details 


I used half a doily and half of a Starbucks coffee sleeve to act as a pocket.  The flowers are all Prima (various collections).  The typewriter wooden piece and the wooden X are all part of the Life Time Collection. I used Victorian velvet distress ink to colour the X and white washed the typewriter with white acrylic paint. See ladies, the possibilities are endless... 


The back of the album has a strip of lace down the center (can't help myself "grin") and a lightly stamped pattern - the beautiful papers from this collection do not need much help!!

Because this album is so easy to make I am thinking of creating a kit (any collection) and PDF instructions.  All you have to do is purchase it!  Let Paper Lane know if you are interested...it is easy ladies...you will be glad you made one for yourself!

Take care and happy crafting...Janine

Wednesday, 17 April 2013

Happy Day Layout

Hello browsers, thank you for stopping by.

Using the beautiful papers from MME The Sweetest Thing - Honey collection.  I  decided to scrap a photo of myself my husband took when we arrived in Dubai a few years ago.  I left it out on my work table and I was later horrified to see that water had spilled on it and this had caused the ink to run.  After close examination I decided the photo did not look that bad and realized it could fit in with the look and mediums I intended to use on my layout.

Here is my layout at a glance...


See on the image below how the pink in the ink ran in the photograph...


I layered different patterned papers from the collection and with some bubble wrap and yellow paint added texture before adhering the photograph.  Some of the tile texture is showing in the top corner.  I did a lot of paint dabbing and glimmer mist sprinkling before I started on my design.  Did very little inkling; distressed all the edges of the papers instead.

I chose the page with the bees...here is a snapshot of the page before I started working on it


I thought the pink in the roses picked up the ink in my photograph perfectly and it also finalized my fourth colour which I wanted to add to the black white and yellow theme! I created some texture with the mini tile texture template,  Took some Viva Pink Glimmer Mist and sprinkled its vibrant colour all over the page.


The black and white flower in the top left hand corner was cut with my cameo - I used black and white dotted paper from the DCWV La Creme paper stack.  The bees and 'honeycomb' shapes was my inspiration and I carried this theme forward throughout my layout!


Yellow daisy like flowers with black centers was perfect for this layout and the black glittery swirl added just that hint of elegance. I finger dabbed white paint on all the flowers for additional definition.


I love how the black and white striped ribbon matches with the black and white paper under the photograph - they are from two different collections.  One always steers away from like on like but there are times when it look good - like this time :-)


Black and white patterned paper under the chipboard sentiments further emphasize the black and white scheme in this layout.  Spun a yellow beaded spray across the page and it looks like drops of golden honey.


The chicken wire is a die cut by Dusty Attic.  I cut it into various sizes and adhered it to different places on my page.  When dry I took a toothpick and ran yellow paint along the lines of the shape to create the illusion of honey.  Love the outcome!


I placed a chipboard rose on the exact image on the paper


I used Sun Sisters glimmer mist on the sun template - think it was the perfect touch to this page.


Products Used
MME Sweetest Thing - Honey paper
MME Sweetest Thing - chipboard elements
MME black striped ribbon - Stella Rose 'boy' trims
Dusty Attic - chicken wire 
Mini Tile texture 6x6 template
WR Memory Keepers sew easy floss
Martha Stewart rubby ducky satin craft paint
Sun sisters and Viva Pink glimmer mist
Tim Holtz paper distresser
Black Soot distress ink
White acrylic paint
12x12 chipboard

Non Paperlane Elements
Yellow flowers, black flower lace and centers
tiny white daisies, bees, butterflies and buttons
Sun stencil and yellow beaded string

With beautiful papers and matching embellishments once can create anything.  Paperlane stocks such a wide variety of papers, embellishments, mixed media tools and products, die cuts, etc.  Too many products to mention.  Let the wonderful products sold at Paper Lane inspire you to create beautiful memories.

Until next time...Janine


Sunday, 13 January 2013

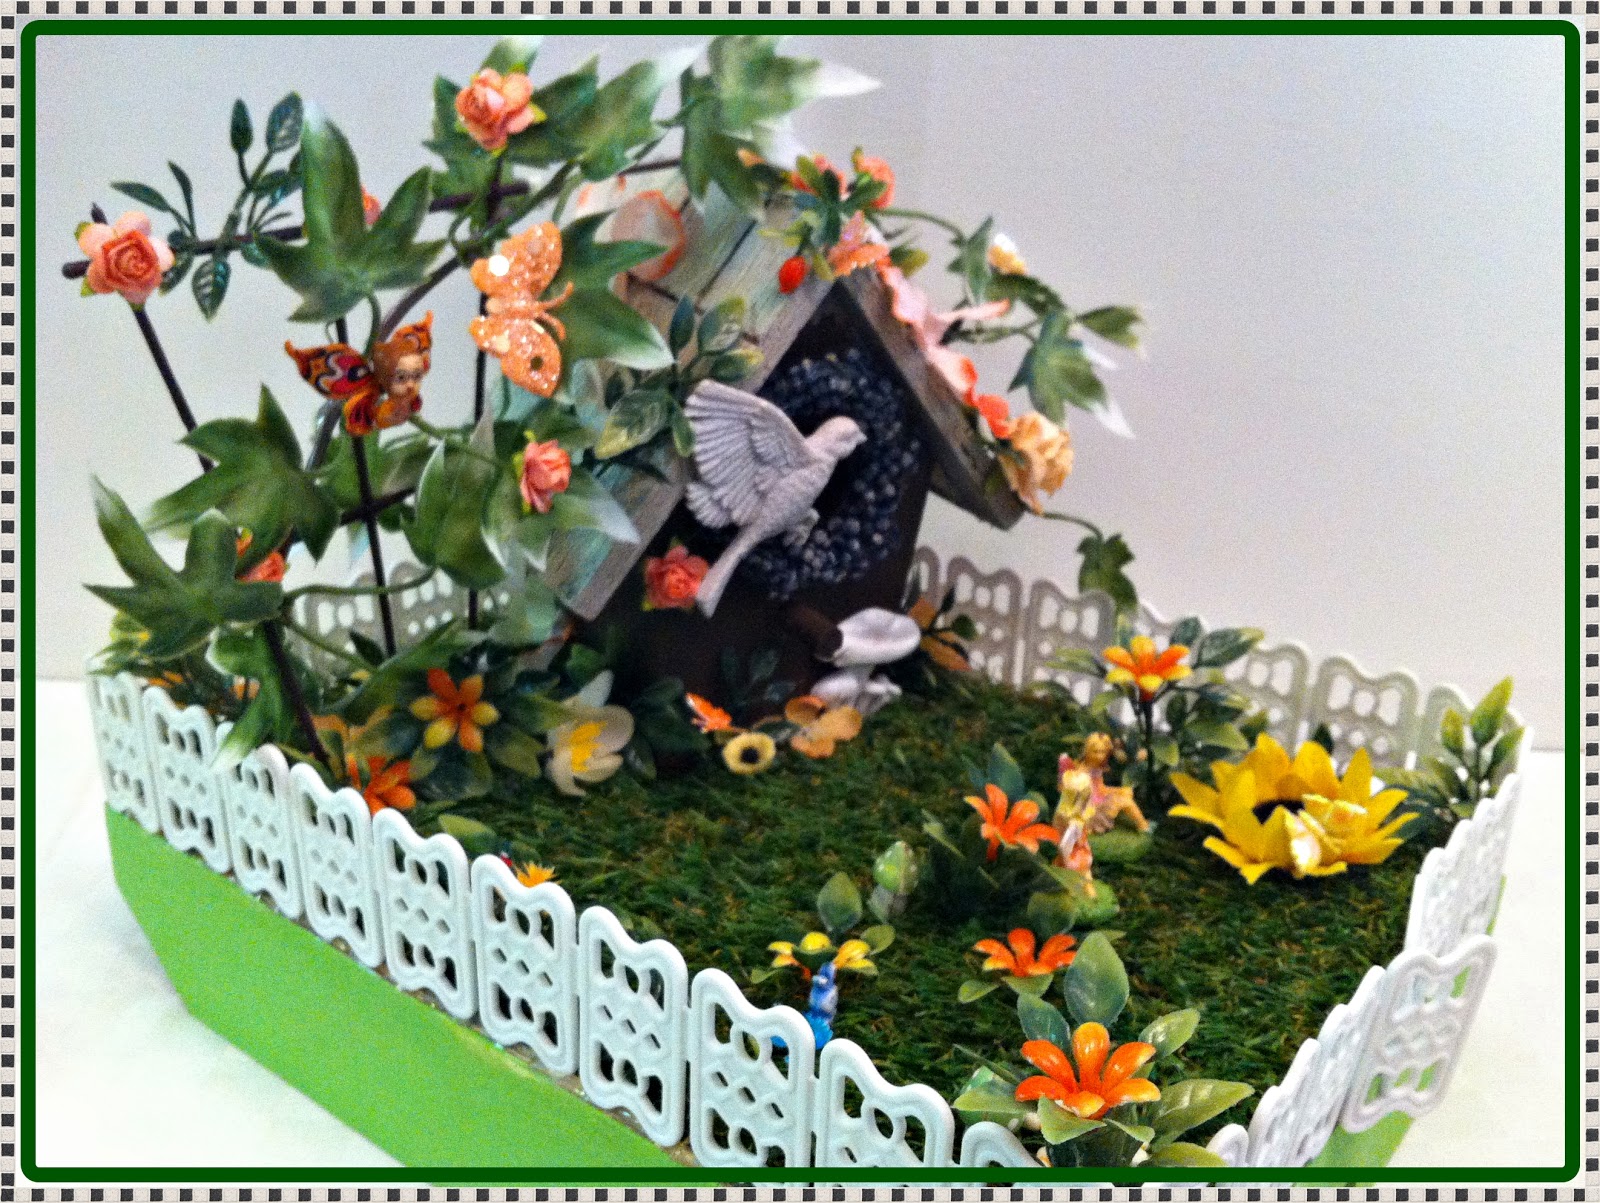
Bird House Garden

I love gardens, birds, butterflies and flowers.  The 'fairy' in me always imagines there are indeed fairies, gnomes, pixies and other ethereal creatures living in their beauty.  This was exactly my thought when I was given a wooden bird house as part of my DT project...to create a garden for the birdhouse - one beautiful enough to attract fairies, butterflies and a few nosy creatures!

Take a look...


For the base of the garden I used a wooden in tray, painted it in Martha Stewart's curry green satin craft paint.  I flipped the tray around and hot glued a grass square to it.

I painted the bird house with vanilla bean paint and once it was completely dry I applied Martha Stewart's weather crackle effect to the back sides and roof only - I left the front as is.  The image below shows the crackle effect beautifully.


The image below is the back view of the birdhouse and garden.


I attached the decorative wreath to the opening of the birdhouse and it fits perfectly.  Positioned the bird hovering to enter the house and adhered a toadstool to the right hand corner.


In the image above and below can you notice some of the nosy creatures who wanted to eavesdrop on the conversation the fairies were having?  Besides the butterflies I see 3 - can you spot them?


I mostly used artificial leaves and flowers; in between I used some peach coloured roses and a sunflower.  The white fence is actually drawer space dividers purchased locally and they resemble a picket type fence perfectly!


All the items in italics and red are available at Paper Lane.  A full range of Martha Stewart paints,  accessories and tools are available at Paper Lane - when there browse the wide range of embellishments and papers too and make your project now!  There is no limit to what you can do with these paints; they are fantastic to use and they wash off easily if you make a mistake.  Pop into Paper Lane and stock up on all your Martha Stewart products...you will not regret it!

So that's it from me today - I hope you enjoyed reading the descriptions and looking at the pictures and I certainly hope you try and create a project with a bird house too!  I think this birdhouse garden would be a perfect gift for a girl  - who would not love to move the fairies around - yeah I did not glue them down!

Thanks for stopping by...


Monday, 7 January 2013

Martha Stewart Stencil Projects

Hey happy crafters...is everybody looking forward to celebrating Christmas??!!  The new year approaches and I hope and pray that 2013 be a wonderful year for all of us filled with love, happiness and new hopes, dreams and achievements!

With this post I share with you a few "Martha Stewart" projects using her paints and stencils.  As I mentioned in a previous post her paints are incredible - they are thick and luscious and can be used on all surfaces...and I mean ALL surfaces.  It applies smoothly, does not have small bits like some paints do and its finish is a dream.  It is perfect for any project.  The wonderful thing about using her paints on any surface means your projects can incorporate paper, walls, canvas, wood, glass, ceramics, mirrors, furniture anything.  It is perfect for craft projects AND home decor projects.

The paints come in a wide variety of types and colours and Paper Lane stocks the entire selection. The product range also includes stencils and templates and with the paints it is easy to turn an ordinary item into something spectacular.

Ladies let me emphasize that all the items I used in my projects were items that I had around my home; all of them plain and boring...so plain in fact that they were hidden from view :-).  I had so much fun with the paints and stencils I went over board as you can see...when I saw how easy they were to use I did not want to stop!  I specifically chose items I imagined everybody has because wanted to show you how versatile these paints are .

In keeping with the festive celebrations I stuck with the Christmas theme. So without further ado lets take a look at the projects...


For the above project I used a simple wooden box and first painted it with white acrylic paint.  I picked a stencil from the flourish collection, positioned it with some Martha Stewart tape and applied the paint with the stencil brushes.  The paint I used is florentine gold glitter paint - the end result??  A perfectly decorated box to hold the left over Christmas trimmings and add a wonderful touch to the decorations in any home.  It is so easy to do - pick a stencil, stick it down and add your paint!!


This time I applied goji berry to a cheap plastic pot plant holder.  With this round surface I made sure the stencil was tightly secured with the tape before applying the paint - I did not want any seepage!!  I also applied the paint with a roller to the rim of the pot plant holder and the water catcher - I think it looks lovely - vibrant enough to now 'live' in my kitchen!


A friend of mine loves potpourri so I bought her a box of fragrant vanilla as a Christmas Gift!  Instead of gift wrapping it I decorated the box itself using a stencil - it turned out great!  I picked the word 'relish' from the inspiration collection and with beetle black satin paint, easily applied it to the acetate box housing the very fragrant potpourri.  A paper doily positioned on top, some silver ribbon threaded through black lace, a flower cut with my Silhouette Cameo, two chipboard stickers, silver bead bling and a pretty tag made by a friend completed the look.  Please note all the items in red italics and more are available at Paper Lane.


I took two matching hand towels from my linen cupboard and with pink salmon and surf satin paint turned them from plain and boring into something warm and romantic!  The 'his' and 'hers' stencil is from the inspiration collection.  Looks great...hmmm...thinking of making some more!!


What is any project if there is not a 'paper' one hmmm :-).  I turned this boring white paper bag into a pretty Christmas gift bag that any receiver would love!  I used green curry satin paint and applied it to the border stencil - love it!  This stencil is also from the flourish collection. A touch of red, a pretty tag and I was done.  It is that easy!

Ladies with the Martha Stewart paints, stencils and tools you can alter any item in your home, give any object a face lift, share beautiful gifts and create lovely keepsakes.  The prices are reasonable, the effort minimal, the products amazing and the end result beautiful! Along with the wide selection of awesome papers and embellishments that Paper Lane has to offer, your home could boast a new look within a few hours.  It also makes perfect gifts so hurry over to Paper Lane today to get yours before stocks run out.  Remember these Martha Stewart products are exclusive to Paper Lane!


Thursday, 13 December 2012

Altered Dome Plaque


I was so excited when I saw this wooden plaque dome in my DT package - I love to alter things!!
So many ideas went through my head like a layout featuring a family photograph, then I thought of painting it and doing some texturing but I wanted to do something that I could use after and not something that would just go on display. 

So I opted to make a key holder...


 Wanted a rusty shabby kind of look so I stuck to browns burlap cremes etc.


First I applied gesso and when dry Martha Stewart's vanilla bean satin craft paint.  Next I applied Martha Stewart's weather crackle effect and when that was fully dried, white acrylic paint.  Super super result!  Her crackle is wonderful to use, easy to apply, dries quickly - I absolutely love it! I cut some corks in half and screwed in normal cup hooks. I dabbed some hazelnut alcohol ink on the hooks and keys to tone down their gold hues. 


Don't you just love this burlap flower???  I had bought this flower at Paper Lane before I even saw my DT package and of course when I decided to use this flower in my project; it set the tone for the design scheme, colour theme and style.  I created the canvas flower myself and adhered the metallic flower to the center - perfect result don't you think??!!


I adhered a square of burlap to the plaque with my glue gun.  Chose to use paper from the DCWV Tradewinds paper stack-I tore and curled the paper before positioning it.  That awesome large key was a find when on vacation in Malaysia and fitted this project perfectly.  I used white ink dabber on the flower and tied a seam binding bow with a stick pin underneath.  The canvas bird is by Prima on which I used creme de chocolat glimmer mist. The key image has glossy accents for definition


The large key is on a chain and I chose to keep the chain on the key in this project.  At the bottom of the key image I poked a tiny hole and locked the chain through it....the image below shows how I spun the chain across plaque.


The gold butterfly with key from the paper collection was perfect!!  Adhered corrugated board onto that lovely patterned paper.  Before adhering the strip of corrugated board I finger painted it with white acrylic paint - love the effect.  Alphas were placed on foam squares before being adhered to the corrugated board.  Love the delicate lace on top and the awesome lace on the bottom! I placed net randomly through out the project. Again I dabbed the dark brown flower with acrylic paint before cocooning it in lace.


The back of the plaque.  I hot glued 4 round wooden knobs to protect the plaque against the wall and spun some old chain.  Did you notice I used the plaque in an 'upside down' position in my project??

Paper Lane is fully stocked with wonderful items to alter - pop in, select one, buy some paints and embellishments and display it in your home.  With such wonderful items in store, you have no excuse ladies so go to paper Lane now!!!

I hope my project has inspired you to alter something...if you do, post your pics, we would love to see.

Take care ladies...Janine


Sunday, 18 November 2012

Altered Domed Plaque


I was so excited when I saw this wooden plaque dome in my DT package - I love to alter things!!

So many ideas went through my head like a layout featuring a family photograph, then I thought of painting it and doing some texturing but I wanted to do something that I could use after and not something that would just go on display. 

So I opted to make a key holder...


 Wanted a rusty kind of look so I stuck to browns burlap cremes etc.


First I applied gesso and when dry Martha Stewart's vanilla bean satin craft paint.  Next I applied Martha Stewart's weather crackle effect and when that was fully dried, white acrylic paint.  Super super result!  Her crackle is wonderful to use, easy to apply, dries quickly - I absolutely love it! I cut some corks in half and screwed in normal cup hooks. I dabbed some hazelnut alcohol ink on the hooks and keys to tone down their gold hues.  Under the hooks are squares of netting just for extra detail.


Don't you just love this burlap flower???  I had bought this flower at Paper Lane before I even saw my DT package and of course when I decided to use this flower in my project; it set the tone for the design scheme, colour theme and style.  I created the canvas flower myself and adhered the metallic flower to the center - perfect result don't you think??!!


I adhered a square of burlap to the plaque with my glue gun.  Chose to use paper from the DCWV Tradewinds paper stack-I tore and curled the paper before positioning it.  That awesome large key was a find when on vacation in Malaysia and fitted this project perfectly.  I used white ink dabber on the flower and tied a seam binding bow with a stick pin underneath.  The canvas bird is by Prima on which I used creme de chocolat glimmer mist. The key image has glossy accents for definition


The large key is on a chain and I chose to keep the chain on the key in this project.  At the bottom of the key image I poked a tiny hole and locked the chain through it....the image below shows how I spun the chain across plaque.


The gold butterfly with key from the paper collection was perfect!!  Adhered corrugated board onto that lovely patterned paper.  Before adhering the strip of corrugated board I finger painted it with white acrylic paint - love the effect.  Alphas were placed on foam squares before being adhered to the corrugated board.  Love the delicate lace on top and the awesome lace on the bottom! I placed net randomly through out the project. Again I dabbed the dark brown flower with acrylic paint before cocooning it in lace.


The back of the plaque.  I hot glued 4 round wooden knobs to protect the plaque against the wall and spun some old chain.  Did you notice I used the plaque in an 'upside down' position in my project??

Paper Lane is fully stocked with wonderful items to alter - pop in, select one, buy some paints and embellishments and display it in your home.  With such wonderful items in store, you have no excuse ladies so go to paper Lane now!!!

I hope my project has inspired you to alter something...if you do, post your pics, we would love to see.

Take care ladies...Janine