Friday, 24 August 2012

Gift Swap

Dubai is truly an amazing city to live in; I am blessed to have this experience. For me one of the great things about Dubai is the concoction of nationalities - here we all live in harmony while we work relax and play.  It's in that mix of play that I met, at a scrapbook workshop by the talented Iris Babao Uy, a most awesome lady named Irene. We have been buddies ever since.  She is an amazing person and in a city where people easily get caught up in the glitz and the glamour; I am blessed to have found a friend who is as awesome as she!

We meet for lunch, we catch up and as scrapbook enthusiasts we shop for yummies together.  When we meet we have always have a goodie swap and with our last time together, we also exchanged gifts we had made for each other.

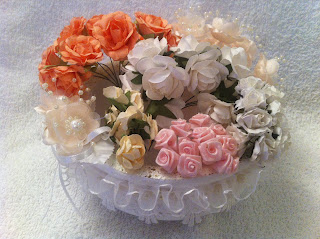
Here is the absolutely stunning gift she made me:-


She embellished a clay pot with gorgeous lace and pearls and if that was not enough, the pot was filled with an array of beautiful paper roses!!!  Am I lucky or what??!!


Check out that gorgeous lace people!!!  The pale peach flower above as a focal point is absolutely stunning - I just love it!!!  Perfect colours, textures and embellishments.


Here is a link to her blog where she describes how she turned out such a gorgeous gift - while you are there check out her talent, I just love her work.  

http://i-createcardsandcrafts.blogspot.com

Thanks again Irene; hugs

Wednesday, 22 August 2012

Altered Stationery Box

I am entering the August iamroses back to school colour challenge with this altered project I created for my daughters desk.  She is 12 years old and it suits her personality and room decor perfectly. Here is a link to the blog challenge:  august-iar-color-challenge-back-to-school

The desk tidy at a glance...


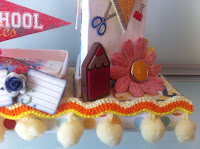
...and various close ups


I bought the desk tidy at a local shop; it was kraft coloured so I painted the set with white acrylic paint quite a few times.  The desk tidy came with a photo frame which was not suitable for what I had in mind so using thick white card stock I created a rectangle box which I glued onto the base of the box.


The box I created is not quite visible in first image because it is covered with numbers and roses but the next image shows it more clearly.  As you see it is covered with a strip of striped paper.


I used the Hello Summer paper collection by Echo Park in this project.  The image above shows various tiny gel stickers all depicting school items.  All the brads in the centre of the flowers are part of the Hello Summer collection.


I used numbers stencil on the decorative paper I glued onto the box - the above image shows some of it peeping out.  I used two different sizes of an ordinary old fashioned school stencil and chipped sapphire and aged mahogany distress ink - dabbed the ink onto the numbers and letters with a make up sponge.


I filled the box with a matching paper clip, rubber and pencil sharpener - these are the items my daughter would use most often.  The tiny roses are an iamroses product and the code is R2-428.


The number squares and school rules flag are from Little Yellow Bicycle and is called fabric favorites - the edges are inked with chipped sapphire.  Unless otherwise indicated, all products are purchased from Paperlane - please click on the link to visit their blog and links to their online store.


The original design of the box was to lift up the top section to gain access to the pencils.  To enable this pull out feature I cut off the section that closed the box and adhered a Tim Holtz knob fastener.  I kept it simple - adding decorative paper would not allow the box to slide in and out smoothly - those tiny gel stickers decorated the sides perfectly.


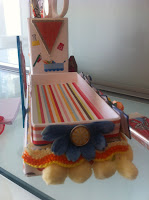
The above image shows the back of the desk tidy.  I did not add the pom pom trim because this side would be against the wall on her desk.  I did however add decorative paper and the same gel stickers on the pencil drawer.  I used double sided tape to attach the banner to a ice cream lolly stick that I painted blue and hot glued it to the base.


 Some close up images of the back of the desk tidy


The above flowers are iamroses flowers and the code is ZQP23-151.  I bought them white, chose three and coloured them with glimmer mist.  I used Sun Sisters for the yellow, Vintage Pink & Red Velvet for the pink and Autumn Nights for the blue.  The image to the right shows the rectangle box I created perfectly - I removed the contents to show the decorative paper I had glued down inside.  I folded the blue flower in half and cut off the prong of the brad before adhering to the box.


The triangular canvas banners are from Little Yellow Bicycle; I used 3d foam to adhere 1 to each side of the triangular box that inserts onto the base of the desk tidy.  Tiny gel stickers complete the look.

I always enjoy creating projects for my daughters room - she is young enough to enjoy it and old enough to appreciate it.  I hope I inspired you to join the challenge too - the prize is awesome; go check it out!

Thanks for stopping by...


Monday, 20 August 2012

Memory Box

Hey crafty people, hope you all enjoying summer and having happy fun sunny days. Here in Dubai it is almost always summer and right now summer is at its peak with days going well into 40 degrees.  Dubai has perfect weather, perfect beaches and a perfect scrapbooking shop to buy yummy scrapbooking goodies to scrap and capture those awesome perfect beach days.  Visit them on www.dubaiscrapbookingstore.com or visit their blog at www.paperlane.blogspot.com or find them on Facebook!

To compliment summer with its vacation, heat and fun, Paperlane has in stock various 'summer' paper stacks to create awesome keepsakes for you and your family. Pop into the store, take a browse, the staff are super helpful and friendly; and do show the rest of us what you created with your 'summer' purchase!  Here is the link to their awesome summer range:

 http://www.paperlane.blogspot.com/2012/06/papers-galore-of-new-arrivals-at-paper.html

So in the spirit of summer I would like to share with you my project using the Simple Stories Summer Fresh collection by Echo Park. These papers are vibrant and so great to work with - super quality too. My youngest daughter is a collector of memorabilia just like her mom! She has been pestering me to make her a memory box for the longest time and when I saw the fabulous summer fresh papers I knew I would give it a go!


I covered the lid with yellow coordinating cardstock and a cut a 6x6 red checkered square from the paper collection; used a Martha Stewart on the edge punch before adhering it onto a white doily. I inked the doily with aged mohogany distriss ink.


I used a variety of flowers to decorate with - prima, vibrant shades of iamroses roses, some pastel coloured iamroses leaves and of course sunflowers and purple puffed flowers from my stash. The alphabet, images and stickers are from the coordinating packs that go with the collection! I highlighted the flowers on a cut out from the collection that reads "fresh picked memories" with various shades of glitter for additional vibrancy. Love that cut out; suits my project perfectly!


I created concertina folds for the side panels inside the box and glued down scalloped shapes to create a more decorative feel. She has so many bits and pieces so those panels will be in good use! How super gorgeous are those papers people! Yummy! Go grab some of that yummy goodies and create a keepsake to store all those awesome pics you are taking!


 The above images are an overall view of the sides of the box - the two adjacent sides are exactly the same.


The above images are close ups of the sides of the box.  Details on how I decorated it below.

For the sides of the box I cut strips of red co-ordinating card stock, used the same Martha Stewart punch and cut strips of decorative paper to adhere to the sides. On one side I added some yellow and pink flowers and on the other 2 sides I used pink flowers and a decorative green sweet embellishment. I added cream lace around the lid and hot glued some yellow pom pom trim on the lace; gold glitter highlighting the on the edge pattern was the final touch.


I love how the box turned out - so vibrant and colourful. Do yoo think she would like it too?

I hope I inspired you to create something similar too. It is easy ladies, no wrong and no right, let it flow and just create! Thanks Janine

Thursday, 16 August 2012

Perfect Couple Layout

This layout features my beloved parents.  As I was growing up their love for each other was always visible and now even more so.  I always said if I could find what they have and share I would truly be as blessed.  My mother said "how could you have used this picture!!".  My daughter on vacation said smile and took this photograph with her cell phone - it was on the spur of the moment and I fell in love with it!

I have used so many different elements on this layout and used so many different techniques - I will try to recall what I used and did since the layout is no longer in my possession but proudly displayed in my parents home.


Papers used:

This & That - Echo Park
Yours Truly - Echo Park
Weekend Market - Bo Bunny
Sweet Spring - Fancy Pants
Yellow cardstock


Prima flowers, Paperlane green flowered trim, Dusty Attic flourish, Tim Holtz swirls, bird and birdcage, K&Co dragon fly. Layout inked with Ranger's aged mahogany distress ink.


More Prima flowers, key from my stash, Ohm sign bought at local shop and hanging from a Tim Holtz swivel clasp, stickers from  the Yours Truly collection.


Prima wall mask coloured with mica powders. Picket fence cut from thick white card stock and embossed and inked with Ranger products.


All the flowers above are artificial, the red spray and tiny white silk flowers from my stash. The beautiful cream lace is Websters Pages Designer Trims with more of the green flowered trim from Paperlane. Vintage oval trinket from my stash.


The teal flowers are Petaloo, leaves are Prima, sprays from a local florist and various artificial flowers.


Butterfly cut from a butterfly card, spray from my stash and red heart from the Yours Truly paper sticker pack.


The fussy cut books and the 'world' papers behind it are from the Bo Bunny Weekend Market collection - my dad is always always reading.


The tea pot was fussy cut from Lil Primrose papers by Kaiser Craft - they are both tea lovers.  Flowers are artificial. The green leaves peeping out from the orange flowers was cut with my silhouette Cameo - I coloured them with pencils.  The yellow flower with the silver bling centre was a hair accessory.  Remember is a cut from a sheet of paper in the Echo Park This & That collection. 


While I was creating this layout I used elements and embellishments that were all about them like the tea pot, the books, the wall with the pickets fence and all the many flowers - they love gardening.  The colours of the flowers are also symbolic as is the Ohm sign.  The paper choice, hearts all over, the colour red, stickers all say much about their love for each other. 


Despite her little moan about the photo itself, my parents totally fell in love with the layout and so did I.  I hope you like it too.

Thanks for stopping by...


Sunday, 12 August 2012

Birthday / Anniversary Card

My husband is not a 'handy man' so when I need something done, like a shelf in my craft room for example :-)) I call Zaphir, one of the maintenance team crew in our apartment block.  He is very sweet and has in the past 3 years become something of a friend.  His wife's birthday and their anniversary is 3 days apart.  He knows I love crafts etc so he asked me to make her a card.  Cards are not my forte but I kind of liked how this one turned out so I am showcasing the card in this post.


It created an A5 sized card using white cardstock and a Martha Stewart daisy punch.  The paper collection is The Glam Rhinestone Pack by DCWV


I created the heart with craft wire and wrapped a beautiful silky beige ribbon around the heart.  I also wound around it some tiny pink buds that I bought at a florist.  The pink flowers on the heart, skeleton leaf, tiny beige flower to the left, purple rose and mustard rose in the centre of the pink Prima flower are all from WOC.  The tiny yellow rose buds on the heart is from WOC too.  

Prima flowers with Prima roses.  I love the lace - bought it at a local shop!


I punched holes at the top in the centre of the card and tied a bow with some blue seam binding from WOC.  I used different sized pink baubles I have in my stash to create a centre piece for the bow for added effect.


The skeleton leaf is at the back of the heart - love that lace!


The journal spot I fussy cut from the collection and added it to inside of the card for a special note - looped the seam binding through punched holes and added a heart charm. 


The paper stack I used is of excellent quality both sturdy and thick so I did not glue it onto the white cardstock as per normal.  Instead the patterned paper and white cardstock is kept together by the blue seam binding.  This also creates the plenty of space he wanted to write her a long and loving letter.  


The above images show side views of the card

I hope she likes it and I hope you like it too.

Thanks for stropping by...