Sunday, 27 January 2013

Altered notebooks and a tag

As you all know besides making mini albums, I love to alter things.  Recently I have altered two notebooks and also decorated the pages making it a semi smash book/journal of sorts.

Here is the first one and it was part of a swap...


The image above and below are taken with different backgrounds and angles. 


I love love this journal!  I used Webster's Pages for the cover with lots of lace and flowers.  There are several charms too.  The black and white tag is a pull out and the alphabet is by XXX

I made another using A Ladies Diary and this time I made a tag too..........


I love the lace on the edge of the journal above and the lace flower below!


The images above and below are of the inside of the cover of the journal.


Just look at that tea pot!  This collection is awesome!


The above tags slide in the pocket and below is close up


The images above and below are but 2 of the many pages inside the journal


The above image is the back of the journal


The tag I created for this journal


I love the little pink dress on a hanger charm - suits this tag perfectly!


A Tim Holtz dress form, metal flower and lock with key are some of the elements on this tag.


Fussy cutting with this collection is amazing; adds so much more to your project!  


Wednesday, 23 January 2013

Stash Record Book

Hey scrappers; hope everybody is scrapping away to their hearts content.  Do you guys also have withdrawal symptoms when other tasks prevent you from slipping away to your craft room?  I do!!! I have been busy with other important tasks and even though I managed to slip into my room now and then it was not enough for my soul :-).  Yesterday I popped into Paper Lane, bought  KaiserCraft's Lake House Collection amongst other things and feel totally revitalised. Tomorrow is also a public holiday here in the UAE so today and until further notice, my order of business is to craft, craft, craft :-)  But first a blog post..

Today I am blogging about a booklet I made a few weeks ago to record certain items in my stash.  I don't know about you guys but more than once I have duplicated a purchase of a certain distress inks or a glimmer mist especially the ones I do not use as regularly as my ever faithful favourites vintage photo and aged mahogany.

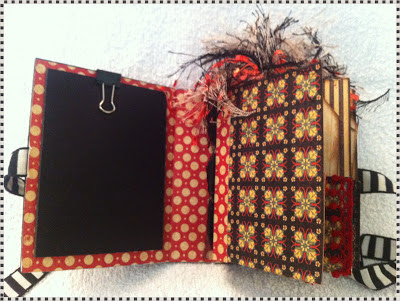
I wanted to create a book that was not going to take up space in my bag and was versatile enough to record the items I wanted.  I used one sheet of 12x12 paper to create the inside pages of this booklet and tags inserted into the pockets act as my recording or stock sheet.  Tell me what you think...


I used the Jumping Joan sheet from Graphic 45's ABC Primer 12x12 paper pad for the cover.  The front and back cover and spine were made from chipboard making the cover durable and flexible.  Details of the items I used are listed at the end of my post.

Ladies I would really like to mention the black and white stripped ribbon I used to tie the booklet together.  I attended school at a girls convent and when my mother purchased the blazer, she also had to purchase the ribbon and sew it onto the blazer herself.  My mother was not good with sewing at the time so she bought more than enough ribbon just in case she messed it up.  Well she didn't mess it up and she kept the excess which she in turn gave to me.  This ribbon has travelled from South Africa to Dubai and it is the first time it has found a second usage.  Love it!!!


In this booklet I have pocket space for 8 tags and a longer tag insert on pages 2 and 4.  I used foam tape to secure the sides of the paper and secured a strip of creme lace on the sides too.  This gives height which will afford me to have double tags inserted into a pocket if I wish to record more stash at a later date.  The tags have the journal lines printed on both sides and its pretty useful for those of us who need to have 1 of everything in a range or collection :-)


The labels I printed off my laptop and are also secured with foam tape.  Everything is inked with vintage photo and the laces and trims are all leftover pieces from other projects - as you can see their lengths are small and its a really awesome way to have found a use for them. 


On the inside of the front cover I secured a black piece of chipboard with a black clip.  This acts like a board to clip your list on.  I recently started a white and blue project and found this little clip board useful to record items I wanted to buy to complete the project.  


See a note slipped under the slip.  As you can see the front of the booklet has not use at this stage.  At a later date a pocket can be adhered to it to render this little booklet even more versatile. 

Supplies used

An ABC Primer by Graphic 45
- Jumping Joan for the chipboard cover
- Calico Kids for the inside page
Primrose Journal Page by Marion Smith
Chipboard, white card stock to print on
Blue and white ribbon (my senior school blazer)
Black Felt Flourish by Ornate Accents
Glass beaded leaf accessory bought locally
Rolled flowers - Cameo Silhouette
Prima leaves, black stationery clip
Tim Holtz adage ticket
Black and Creme flower bought locally
Fibers, laces and trims from my stash
Black and white ribbon 

This booklet is awesome ladies, I have used it on several shopping trips since I created it.  Make one for yourself and never duplicate a purchase again!

Sunday, 13 January 2013

Bird House Garden

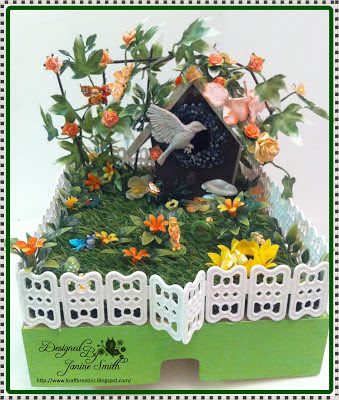
I love gardens, birds, butterflies and flowers.  The 'fairy' in me always imagines there are indeed fairies, gnomes, pixies and other ethereal creatures living in their beauty.  This was exactly my thought when I was given a wooden bird house as part of my DT project...to create a garden for the birdhouse - one beautiful enough to attract fairies, butterflies and a few nosy creatures!

Take a look...


For the base of the garden I used a wooden in tray, painted it in Martha Stewart's curry green satin craft paint.  I flipped the tray around and hot glued a grass square to it.

I painted the bird house with vanilla bean paint and once it was completely dry I applied Martha Stewart's weather crackle effect to the back sides and roof only - I left the front as is.  The image below shows the crackle effect beautifully.


The image below is the back view of the birdhouse and garden.


I attached the decorative wreath to the opening of the birdhouse and it fits perfectly.  Positioned the bird hovering to enter the house and adhered a toadstool to the right hand corner.


In the image above and below can you notice some of the nosy creatures who wanted to eavesdrop on the conversation the fairies were having?  Besides the butterflies I see 3 - can you spot them?


I mostly used artificial leaves and flowers; in between I used some peach coloured roses and a sunflower.  The white fence is actually drawer space dividers purchased locally and they resemble a picket type fence perfectly!


All the items in italics and red are available at Paper Lane.  A full range of Martha Stewart paints,  accessories and tools are available at Paper Lane - when there browse the wide range of embellishments and papers too and make your project now!  There is no limit to what you can do with these paints; they are fantastic to use and they wash off easily if you make a mistake.  Pop into Paper Lane and stock up on all your Martha Stewart products...you will not regret it!

So that's it from me today - I hope you enjoyed reading the descriptions and looking at the pictures and I certainly hope you try and create a project with a bird house too!  I think this birdhouse garden would be a perfect gift for a girl  - who would not love to move the fairies around - yeah I did not glue them down!

Thanks for stopping by...


Wednesday, 9 January 2013

Wedding Card

I made this wedding card for a dear friend and really wanted to do something different although staying with a wedding theme.  My friend is very traditional and if I had created anything out of the ordinary I would have received a "oh how nice" response :-).  

When I gave her the card it was just the response I wanted!  So she loved it, I loved it and I hope you love it too...


I cut the box card with my cameo silhouette - a shadow box card designed by Alaa' Studio.  I used black cardstock for the cutting and did another cut with the designer paper.  I cannot remember the paper range but it was exactly what her wedding colours were - pale peach, creme and grey.  It was an older range too and very pretty.  


Its not too visible but if you look past the heart to the back you will see 3 layers of paper - these layers are squares of Pion paper inked with aged mahogany distress ink. The heart is outlined with perfect pearls and above the heart is the word love spelt in silver letters.


The couple image I downloaded from the Internet.  I used a black felt tip pen to emphasise the lines and inked the image lightly with both vintage photo and aged mahogany.  I added a delicate piece of  netting to act as the veil for the bride and secured it with a pearl heart and tiny pearl for her earring. 


A paper doily inked and cut so that it shows on one side only; a lovely bouquet with a delicate white bow.  That bouquet resembles her actual bouquet so much she could hardly believe it when she saw the card.  


The pink cluster is from an artificial flower and the roses and pink flower spray are from WOC.  At the back of the cluster there is a Prima and skeleton leaf, too pretty. The bling swirls on the wedding gown is from Prima too


The rosette I cut with my silhouette too and of course used the same designer paper.  I inked all the folds and creases of the box card with vintage photo and aged mahogany distress inks.  A tiny pearl in the rosette completed the look


Close up of the flowers and the beautiful lace gifted by a  friend.  I coloured the lace inside the card with glimmer mists but left it plain for the outside; looped some pretty peach ribbon through it.


A different angle of the box card

Hope you enjoyed my blog post.  

Please leave a comment and thanks for stopping by...


Monday, 7 January 2013

Martha Stewart Stencil Projects

Hey happy crafters...is everybody looking forward to celebrating Christmas??!!  The new year approaches and I hope and pray that 2013 be a wonderful year for all of us filled with love, happiness and new hopes, dreams and achievements!

With this post I share with you a few "Martha Stewart" projects using her paints and stencils.  As I mentioned in a previous post her paints are incredible - they are thick and luscious and can be used on all surfaces...and I mean ALL surfaces.  It applies smoothly, does not have small bits like some paints do and its finish is a dream.  It is perfect for any project.  The wonderful thing about using her paints on any surface means your projects can incorporate paper, walls, canvas, wood, glass, ceramics, mirrors, furniture anything.  It is perfect for craft projects AND home decor projects.

The paints come in a wide variety of types and colours and Paper Lane stocks the entire selection. The product range also includes stencils and templates and with the paints it is easy to turn an ordinary item into something spectacular.

Ladies let me emphasize that all the items I used in my projects were items that I had around my home; all of them plain and boring...so plain in fact that they were hidden from view :-).  I had so much fun with the paints and stencils I went over board as you can see...when I saw how easy they were to use I did not want to stop!  I specifically chose items I imagined everybody has because wanted to show you how versatile these paints are .

In keeping with the festive celebrations I stuck with the Christmas theme. So without further ado lets take a look at the projects...


For the above project I used a simple wooden box and first painted it with white acrylic paint.  I picked a stencil from the flourish collection, positioned it with some Martha Stewart tape and applied the paint with the stencil brushes.  The paint I used is florentine gold glitter paint - the end result??  A perfectly decorated box to hold the left over Christmas trimmings and add a wonderful touch to the decorations in any home.  It is so easy to do - pick a stencil, stick it down and add your paint!!


This time I applied goji berry to a cheap plastic pot plant holder.  With this round surface I made sure the stencil was tightly secured with the tape before applying the paint - I did not want any seepage!!  I also applied the paint with a roller to the rim of the pot plant holder and the water catcher - I think it looks lovely - vibrant enough to now 'live' in my kitchen!


A friend of mine loves potpourri so I bought her a box of fragrant vanilla as a Christmas Gift!  Instead of gift wrapping it I decorated the box itself using a stencil - it turned out great!  I picked the word 'relish' from the inspiration collection and with beetle black satin paint, easily applied it to the acetate box housing the very fragrant potpourri.  A paper doily positioned on top, some silver ribbon threaded through black lace, a flower cut with my Silhouette Cameo, two chipboard stickers, silver bead bling and a pretty tag made by a friend completed the look.  Please note all the items in red italics and more are available at Paper Lane.


I took two matching hand towels from my linen cupboard and with pink salmon and surf satin paint turned them from plain and boring into something warm and romantic!  The 'his' and 'hers' stencil is from the inspiration collection.  Looks great...hmmm...thinking of making some more!!


What is any project if there is not a 'paper' one hmmm :-).  I turned this boring white paper bag into a pretty Christmas gift bag that any receiver would love!  I used green curry satin paint and applied it to the border stencil - love it!  This stencil is also from the flourish collection. A touch of red, a pretty tag and I was done.  It is that easy!

Ladies with the Martha Stewart paints, stencils and tools you can alter any item in your home, give any object a face lift, share beautiful gifts and create lovely keepsakes.  The prices are reasonable, the effort minimal, the products amazing and the end result beautiful! Along with the wide selection of awesome papers and embellishments that Paper Lane has to offer, your home could boast a new look within a few hours.  It also makes perfect gifts so hurry over to Paper Lane today to get yours before stocks run out.  Remember these Martha Stewart products are exclusive to Paper Lane!