Sunday, 28 October 2012

Vintage Charm Altered Bottle

Hi there crafty people, hope all is well your side??!!  With this blog post I am sharing my latest project...an altered (olive oil) bottle.  I must confess I bought this particular brand of alive oil just for the bottle "blush" and could hardly wait to start altering it.  One of my favourite things to alter are jars and bottles!

Although this bottle will eventually find a home in the USA for an awesome lady I have befriended, I am in the interim submitting it to the The Shabby Tea Room to enter their current challenge # 137 "vintage charm".  Just click on their name above and you will be taken directly to their challenge link...

The inspirational image...


Hope you enjoy it...


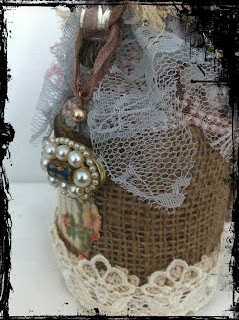
I covered the bottle with  burlap, different netting and lace.


The pearl'charm' above is from a piece of jewelry my great grandmother gifted to me - it was perfect for this altered bottle.


A vintage label with flower soft.  A slight tear in the label to create more of an effect.


The two small crochet flowers was part of a set that included a larger one that I used for the bottom of the bottle - see the image below...


I made the pink flower myself - just added a peal center.


Lots of different types of lace


Pink and blue flowers from IAR


Pearl string and centers...


Love love this bottle; planning on making two more of different sizes as part of my gift.

Hope you enjoy, so glad you stopped by...........please leave a comment...


Thursday, 18 October 2012

Rustic Shabby Card

Hey crafters, my project  today is a card with a tag and I am entering it in The Shabby Tea Room week # 136 "rustic elegance" challenge and in The Ribbon Reel # 39 challenge "shabby naturals" challenge.  If you are curious about their website just click on their names above to go directly to the challenge.  Awesome websites people and worth the effort!


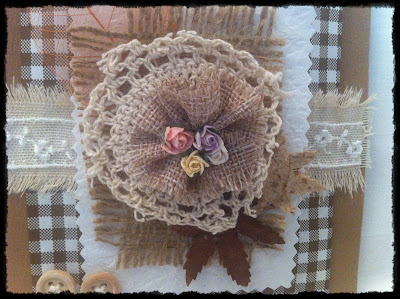
I cut the checkered bag to the desired size using decorative scissors - the twine used in the tag peeps out from the pocket as the photograph below indicates...


The Prima burlap flower was got glued onto the center part of the vintage doily - I cut out that part and the tiny roses look so pretty in the center. 


I used canvas ribbon and lace from my stash  The leaves are also old stash which I have had for a long time - they were initially used for wedding favours I had made.


Its barely visible but I used white Adirondack paint dabber on the buttons to give it that shabby look and used ivory twine for the crisscross centers.  


More views...


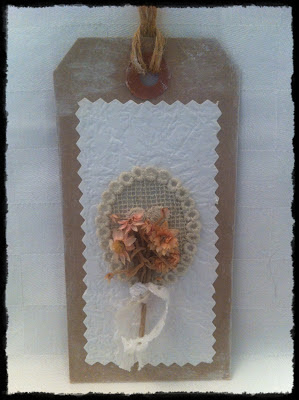
 The tag is quite simple to make - used the paint dabbers to shabby chic it and used the same vintage paper on the center.  


 The flowers in the center of the Jolees Boutique stickers is scented potpourri - love it!


 More views...


Products Used
brown checkered paper bag, brown cardstock
Vintage white embossed paper
Burlap, canvas ribbon, vintage crochet doily
Prima canvas flower, WOC tiny roses
Lace, WOC skeleton leaf, various leaves
Maya Road buttons and kraft tag
Jolees Boutique stickers, potpourri
Adirondack white paint dabber


Friday, 12 October 2012

Altered Shabby Chic Bottle

I am very passionate about recycling and reusing and it has resulted in me altering anything that I would normally throw away. When there are occasions to celebrate my gifts will more than likely be something that I altered.

At The Shabby Tea Room this week the challenge is Beautiful Romance using pink, green, white and lace.  I just recently discovered their challenge blog and I am totally in love with them.  As you all know I love shabby chic and seek any opportunity to create something in that theme. Click on their name above and browse their blog; its awesome!

Here is their inspirational image...


My entry for their week # 135 challenge is an altered bottle:


Inside the bottle is a romantic poem printed on beautiful paper!


 These 4 images are the different sides of the bottle


In the image below you can see the poem inside amongst rose petals and a string of pearls.


 I used many strips of lace for the neck of the bottle and hot glued a flower on the top of the cork.


I really loved how this bottle turned out and I plan to gift it to a dear friend of mine for her birthday!

Thanks for stopping by...


Thursday, 11 October 2012

OUAS October Challenge

I am entering the October challenge at OUAS.  They are an amazing crowd with the most inspirational DT members and guest artists.  Every month they have a challenge that inspire your creativity and imagination.  I will make a huge effort to enter every month where and if possible.  Here is the link to their website; click on their name...Once Upon A Sketch and browse...like me you might be inspired to enter their challenges! 

Here are the details of their challenge...

" We would like you to create a layout based on this quote. You can interpret it ANY way you like. There is no wrong or right way to interpret this quote  but your layout must incorporate something from this quote AND the sketch below. Please make sure that we see some sort of journalling on your layouts and please tell us where your journalling is . Hidden journalling is perfectly fine ".

So without any more fuss here is my layout...

I love this photograph of my daughter! She took so many that day that it inspired me to use "take another shot" which is part of the quote.  She took her photographs late afternoon and her bedroom was filled with brilliant sunshine which in turn lent her photographs that soft hue - love it!


On this layout I did a real mix and match of products; I will list them at the end of my post.  
I used Adirondack acrylic paints with the bubble wrap and some Martha Stewart white texture effect paste on the brick template.  Distressed and tore the bottom sheet of paper and outlined the curves of top sheet with light green acrylic paint.


The top corner is a green hair accessory that my daughter threw away (I keep everything - I am a junk junkie :-), a green Prima flower and a blue butterfly button by BoBunny. Layered various doily's for that cluster effect and the beautiful Victorian looking rose in the centre of the crochet flower is actually a brad by MME from the Miss Caroline collection.  My journalling is hidden but the corners of the tickets with the pink and green flower is showing just under the leaf branch dangling down. I cut the green leaf flourish under the pink chipboard flower with my Cameo


Placed a smaller version of the photograph on a memories journalling card.  Fussy cut the flower image only so that I could slide the photo behind it.  The green flower is by Prima and the black and pink flower is by Petaloo.


A beautiful cluster arrangement of IAR and WOC flowers and leaves.


More beautiful flowers.  The green image peeping out I fussy cut from the Spring Jubilee collection by Pink Paislee.  I stuck a random off cut piece of pink net under the rose paper image.  I secured a Prima heart shaped button on a brad from the Hello Summer collection by Echo Park; tied a bow with white twine.


The alphas are from This & That by Echo Park and I layered them on green and pink paper - distressed them a bit with  various paint dabbers.  The pink chipboard flower is by MME from The Sweetest Thing collection.  I dabbed some white acrylic paint on it for extra definition.


The above images show the green charm I dangled from the Prima Flower.  
On the green Prima flower I hot glued a beige crochet flower; then alcohol inked a normal  safety pin, looped the charm through it and hot glued it to the crochet flower.  Crinkled up some WOC vintage seam binding, tied a bow and hot glued it to the safety pin.


Here I shaped pink glittery net under the cluster of flowers - love the effect! 


I fussy cut the pink roses and leaves from a sheet of paper from the French Country Stack by DCWV.  Also cut some random leaves so that I could layer them slightly over the photograph.  See a close up image below...


I fussy cut the pink and green flowers so that I could insert her photograph - that is a noteworthy from the Natures Garden collection by Prima.  Added glossy accents to the flowers for extra effect.


Black lace under the layers of paper


I had some leaf branch cutouts from my Cameo handy to I placed them under the pink leaves and arranged some IAR roses to give the effect of it all dangling down...see another image below...


Products Used

Patterned Papers:
Making Memories - Mistletoe
DCWV - French Country Stack
Pink Paislee - Spring Jubilee

Embellishments:
MME: brad, chipboard flower
Echo Park:  brad, This & That alphabet and journalling tickets
Prima: Natures Garden noteworthy, flowers, roses, button, leaves
WOC: roses, leaves, seam binding,
BoBunny: butterfly button
IAR: roses
Petaloo: flowers
Cameo: leaf branches and leaf flourish

Stash
charm, safety pin, flower hair accessory, doily's, creme white & black lace,
various doily's, skeleton leaf, memories journalling ticket,
pink & creme net, bubble wrap,
artificial leaves, black 12x12 chipboard

Tools & Other:
Crafter's Workshop wall template
Martha Stewart white texture effect paste
Light green acrylic paint by Fister
Adirondack Paint Dabbers:
white, mountain rose, pool, lettuce
Glossy accents, double sided tape, glue gun
Tim Holtz paper distresser